
CAR CAMPER


Car Camping: The New Trend in Town
Move over #Vanlife, because there’s a new trend in town – car camping! Turning your car or SUV into a cozy home on wheels can be a perfect way to start checking off your bucket list road trips or planning those camping adventures you've been dreaming about – all for a fraction of the cost. While adventure vans can be a big project (and an even bigger hit on your wallet), don't worry! With just a few clever tweaks, you can transform your trusty car into a mini-motorhome for a fraction of the cost. It may not be as spacious as a full-on van conversion, but it's still a genius solution for those impromptu road trips and camping adventures. So, buckle up and let the car camping journey begin!
Ready to embark on an epic adventure? Let's turn your ride into a cozy adventure rig with these simple steps!
Analyze your available space
No matter if your ride is a tiny two-door or a spacious four-door, it can still be your trusty adventure sidekick. Smaller cars are even better as they're fuel-efficient, unlike those gas-guzzling motorhomes.
Next, check the back seat area and see how much space you have when the seats are folded down. If there's enough room for someone to stretch out horizontally, voila! You've got yourself a bed. If not, don't sweat it - a rooftop tent is an awesome alternative!
I have a Rav4, which was plenty of space to lay down in. I determined I needed about half the space for sleeping, and the other half could be used for storage.
2. Analyze your needs
Here are some questions to ask. Do you need storage inside your vehicle? If so, what do you plan on keeping inside? The less stuff you have in your car, the more room you’ll have for yourself. Attachable rooftop storage boxes are your best bet for space-saving storage, in addition to whatever storage you build as part of your bed platform. Consider the activities you will be doing and how much storage space you will need. We will get into some crafty storage solutions. You would be amazed at how much you can take with you!
How long will you be gone? Is this a weekend trip or a week long trip? Will you be gone for an extended period of time and need some essentials? Camp stoves, refrigerators and power sources can also take up a lot of space but make your car camper more comfortable for longer stays away from home.
My build was designed with the intentions of being on the road for an entire summer. I needed to maximize my space for both storage, comfort, and luxuries like a coffee pot. I say the coffee pot was a luxury, but its more like a necessity, but either way it needed to come with me along with all my other gear.
3. Build Your Platform
If you have some carpentry experience, this will be a fairly easy build. If you don’t, chances are you have a friend who does. I was fortunate enough to have a step dad and family friend who were willing to take on my crazy project.
There are a number of platform designs out there. Spend some time browsing the internet for inspiration on how you’d like to design yours. I chose to do a slightly raised plywood base. I wanted usable space underneath but also give as much head space to move around.
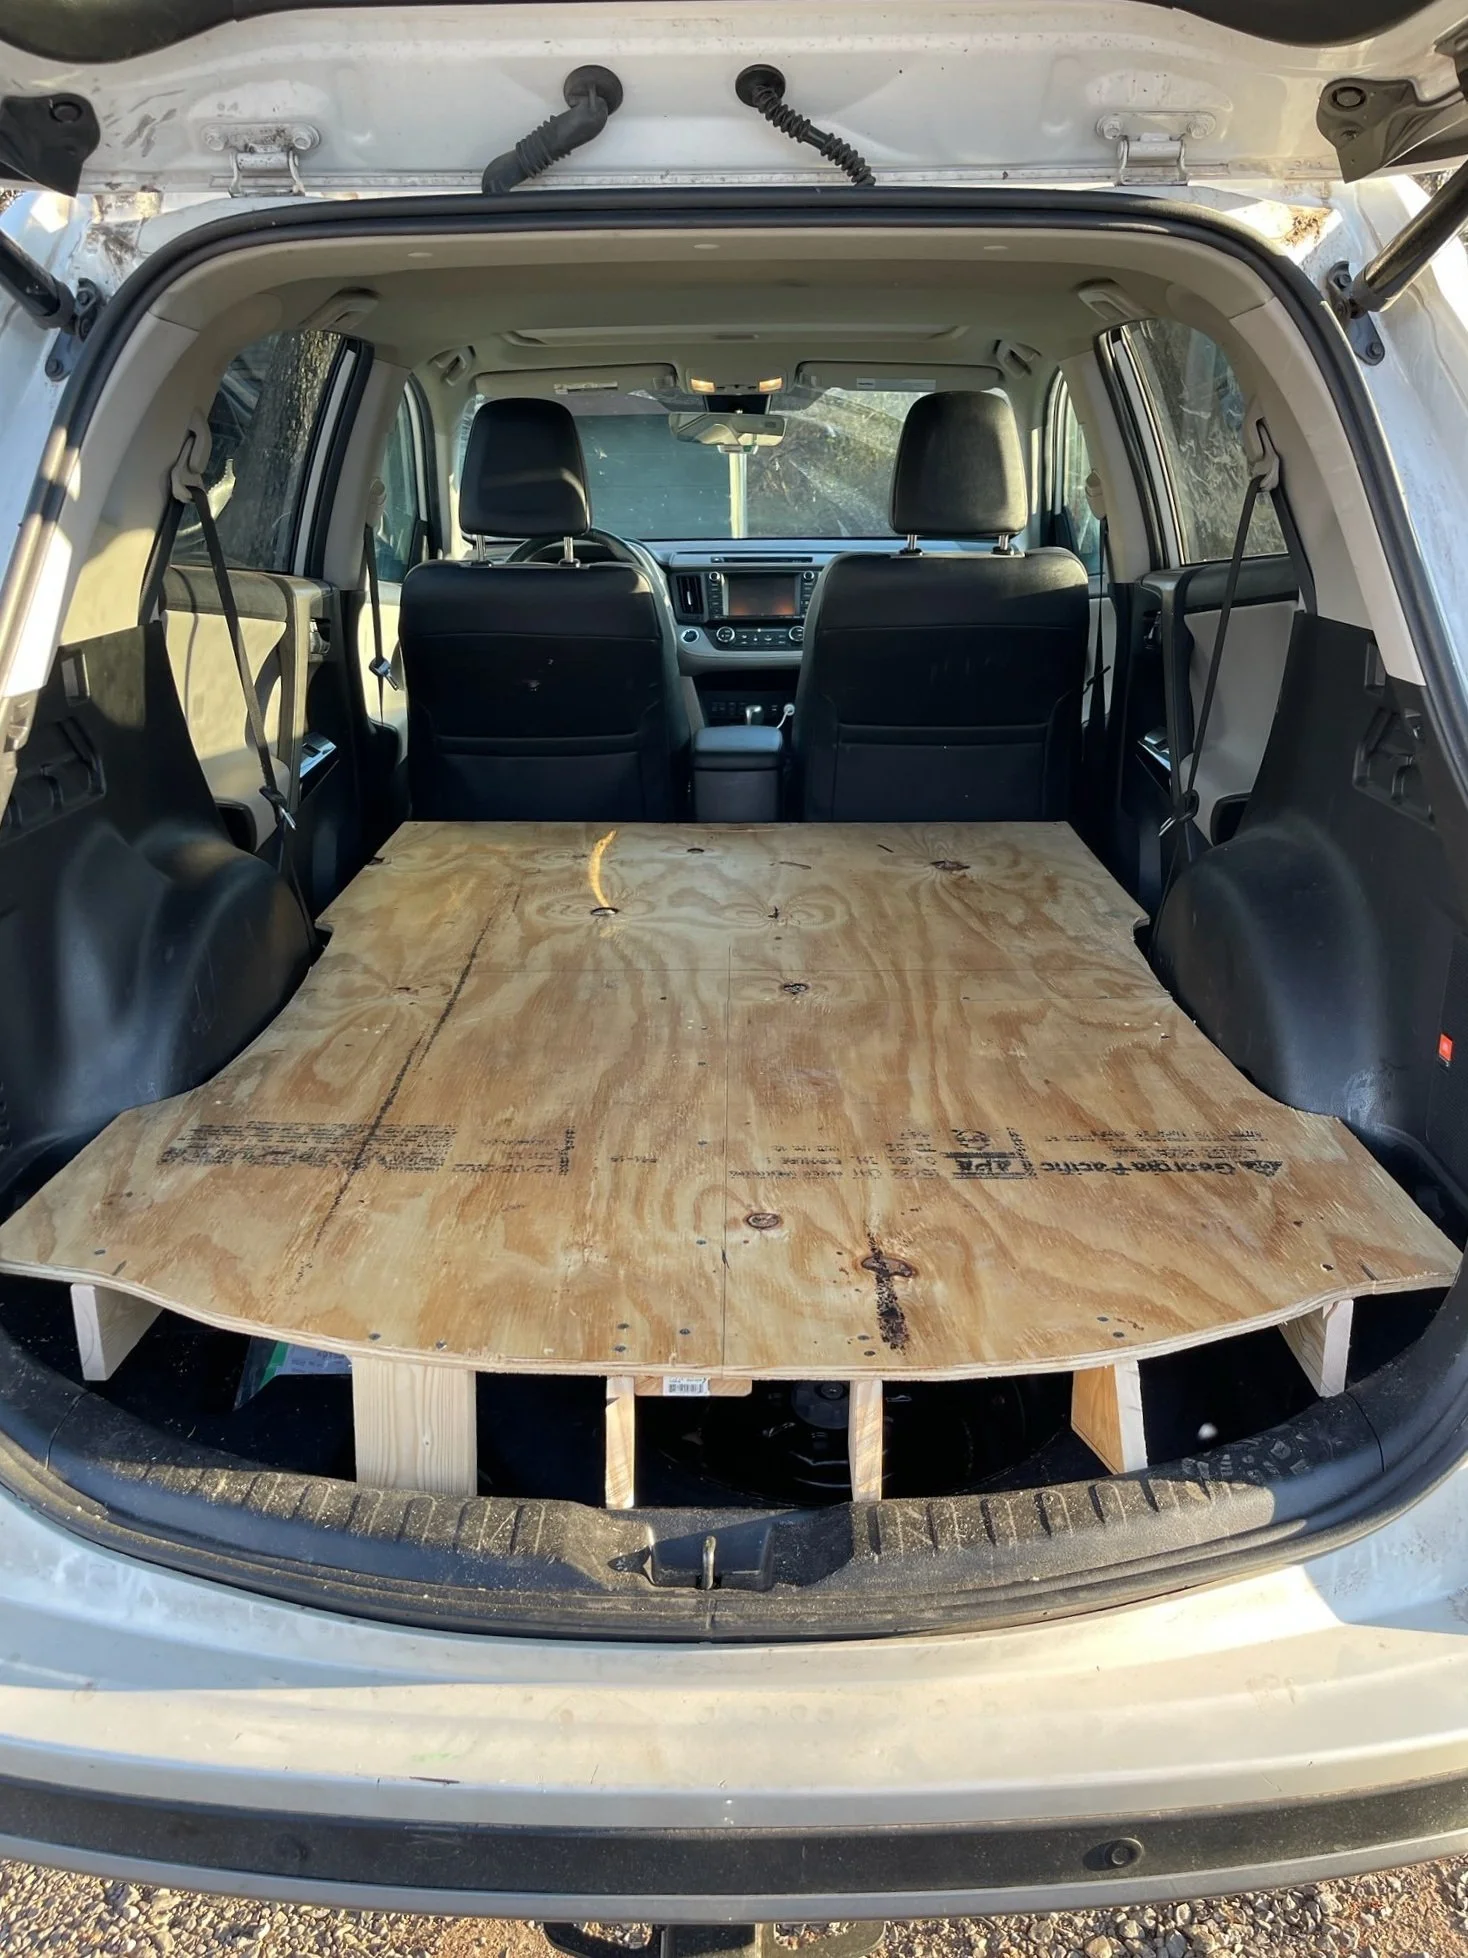
To begin, we removed the seats and traced out the floor of the car. We used cardboard first to create a template for the plywood, then traced/ cut out the plywood base. We used 2 pieces of plywood for this design to create an access for the spare tire which would be located under the bed portion. Yes, I would have to remove the foam mattress portion in the event of a flat, but would not have to remove the entire wooden base. Make sure to keep this in mind when designing your build.
Angled blocks of wood were attached to the base of the plywood in the back for support with out taking up the precious real estate for storage underneath the platform. For the height, I chose 11 inches. This gave me room to fit 2 large under the bed storage boxes under the platform and give me the most head room inside.
4. Plan your big items first, then build around them
I made a list of all my must have items that would take up space, then started designing around them. These came down to the bed, camp stove/kitchen items, car fridge, power pack, and clothes. Lots of clothes. In all fairness, I am a girl, but also needed a wide variety of options as I was heading to Alaska for a summer to photograph weddings and explore.
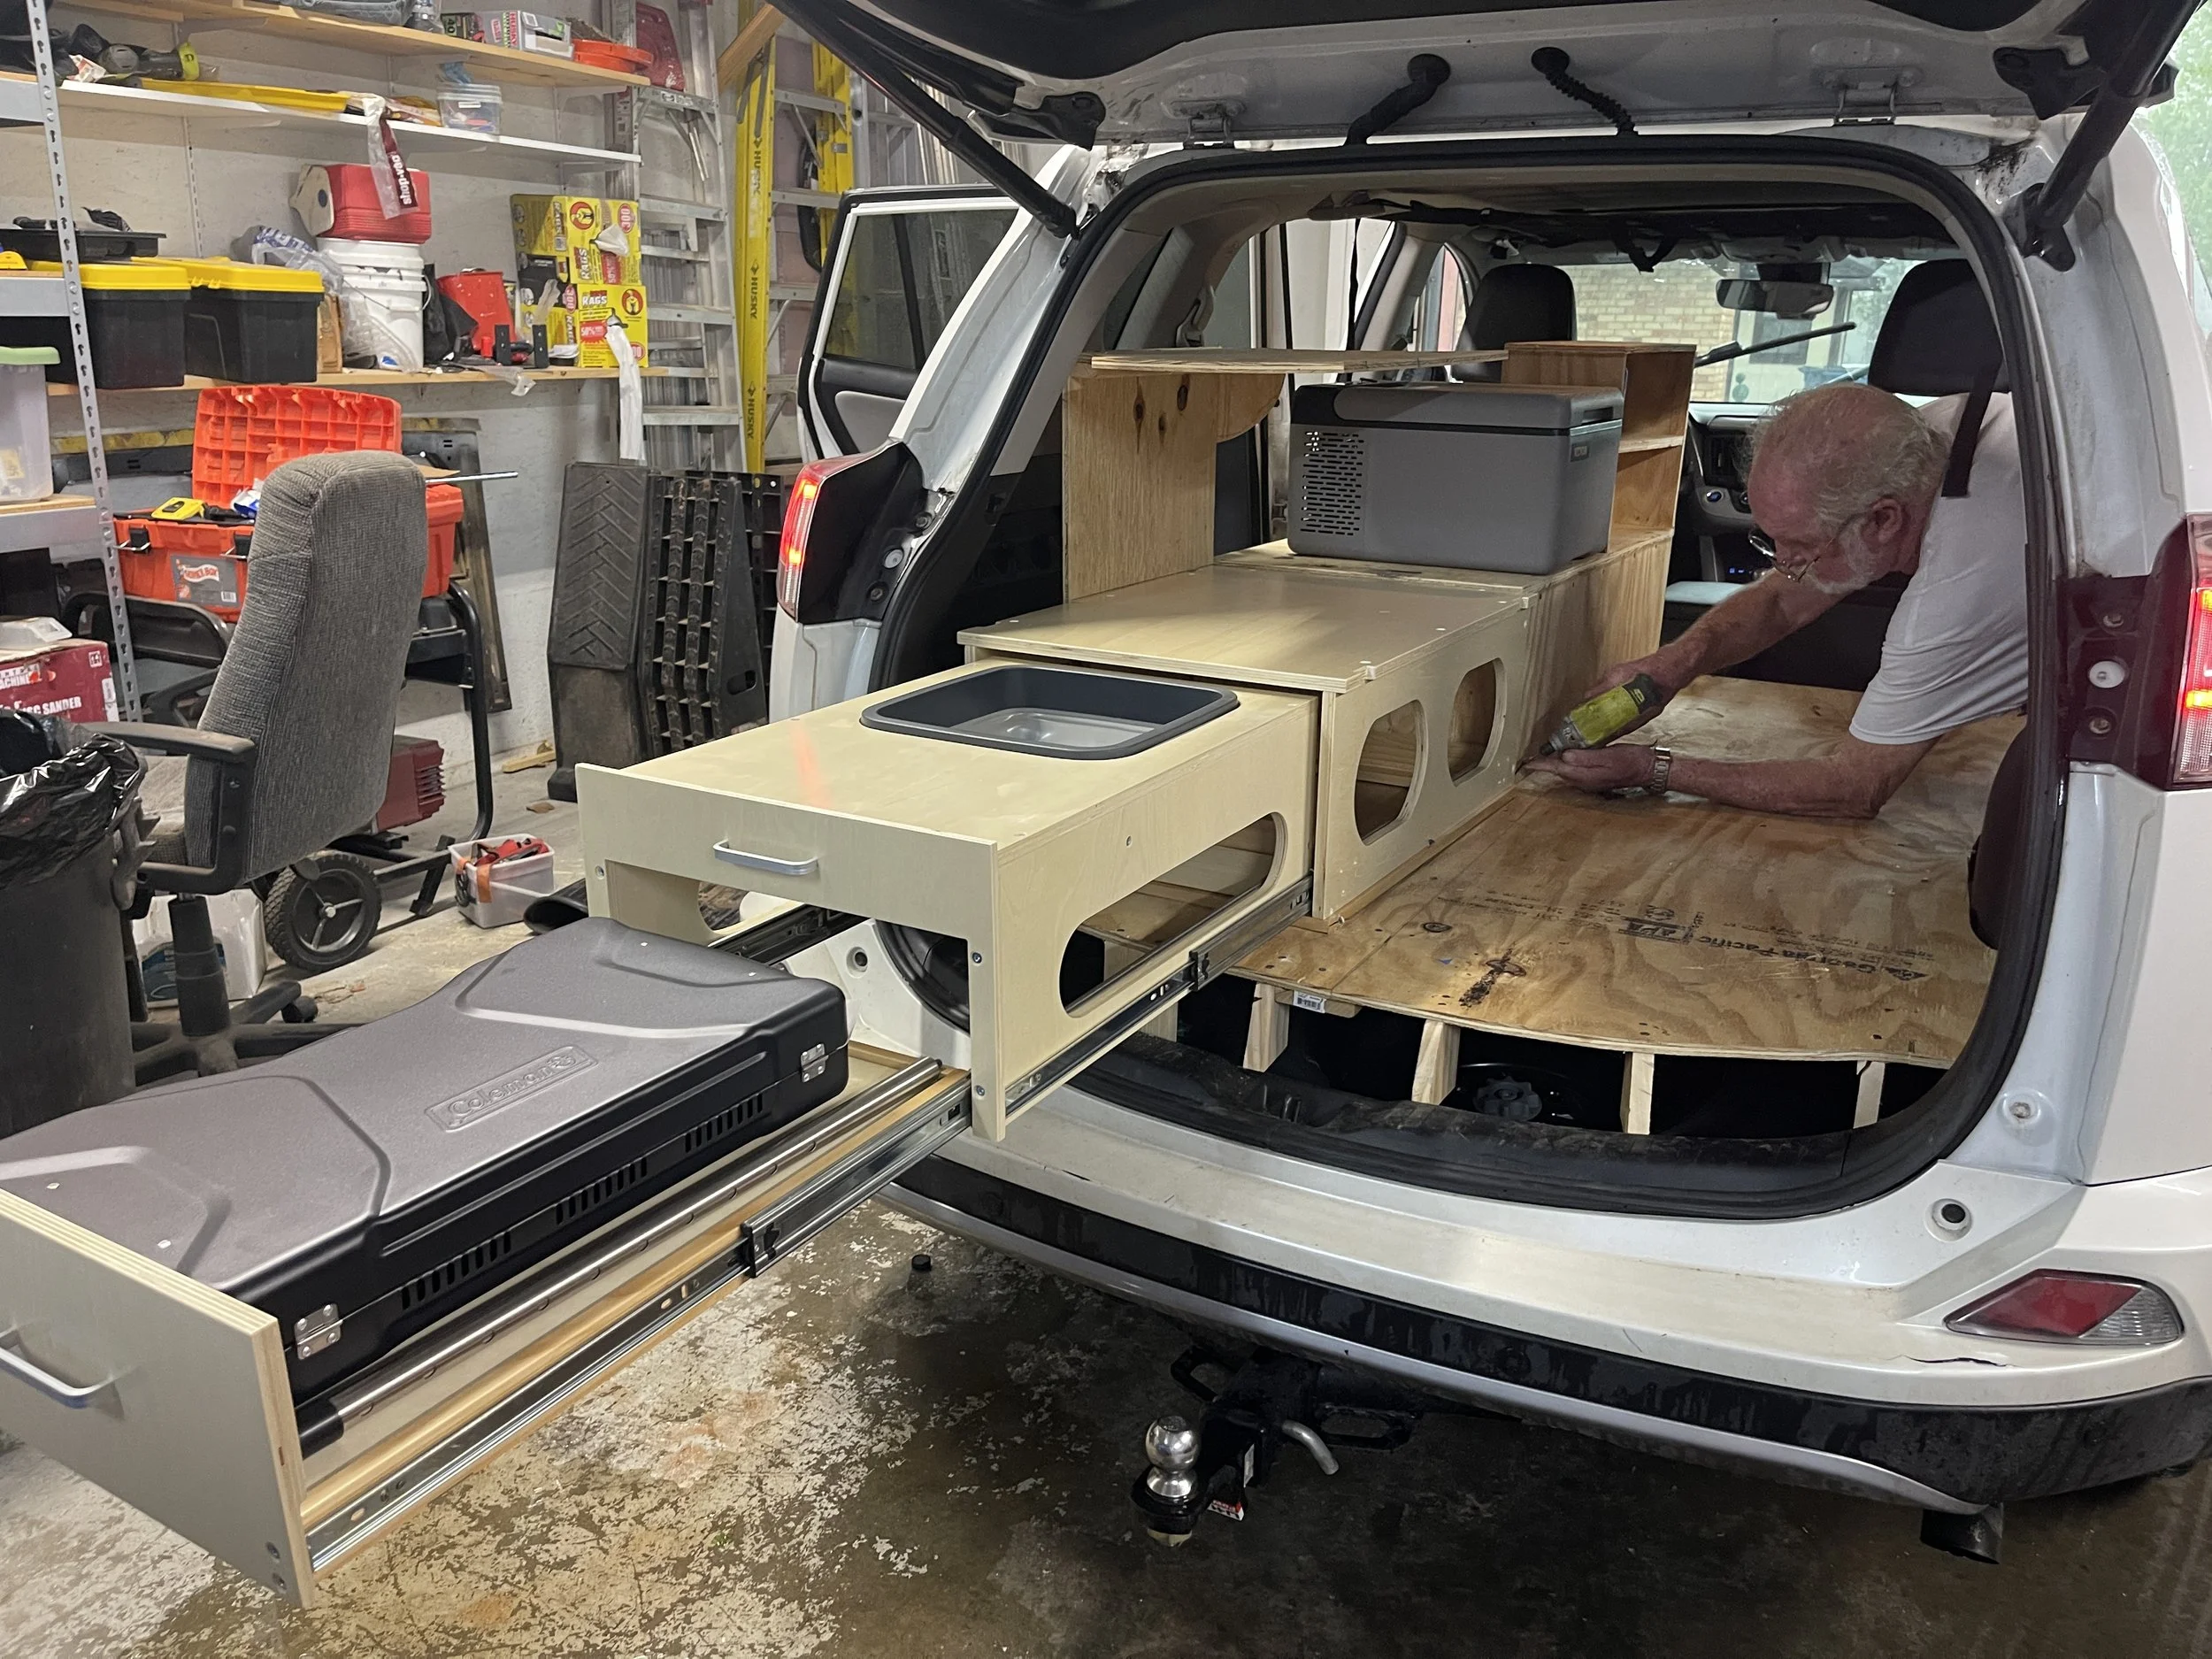
I found a pre-made compact pull out cabinet to house the camp stove and kitchen utensils. It also had a flat solid top I knew I could use it for some additional space. I taped out the outline of the cabinet on the plywood and started to design from there.

I used foam board and cardboard again to map out some templates and play around with some design options as I started to build around the premade cabinet. Next big space item to incorporate was the fridge. I wanted the option of cooking healthy and fresh food while on the road, so again the refrigerator was a necessity.
By continuing the height of the premade cabinet down the entire left side of the car, I was able to create a kitchen area in the back and a bedroom area up towards the front. I measured the width of the fridge, then built storage shelves out of the remaining space on the bed facing side to house all of my everyday use items.
The back side of the refrigerator and storage shelves were left open on the non bed facing side allowing for storage totes and be accessible by opening the rear driver side door.

5. Personalize and organize

With the carpentry portion done, it was time to start moving in. I used the top of the premade cabinet as a kitchen prep area. I used velcro to secure a serving tray, plate and bowl, my coffee pot, etc. I like to collect magnets, so I added a metal flashing to stick my magnets on and give it a little more personal touch. On the underside of the shelf, I added a battery powered push light.
I wanted an upper shelf to make for some containers for staple pantry items such as rice, pasta, dry beans, etc. I put Velcro on the under side of the containers and baskets to help them stay in place while driving which worked out beautiful! I added some wire storage baskets for tubber ware, spices, and other kitchen necessities.

Towards the front of the back seat, I made my bedroom area. I wanted shelves to house my every day items. I added some colorful storage containers to organize my toiletries and other common used items for a quick grab and go. I used small bungee cords to secure the items then added some battery push lights.

The backside of the fridge and bedroom shelves were open shelving. I was able to fit several totes for additional storage and also to house the Jackery power bank. We cut a small hole in the plywood to feed the power cord of the Jackery into the back seat ad power port. It was convenient to leave plugged in to charge while I was driving, but portable enough to remove and use outside the car if needed.
Under the platform housed the 2 under the bed storage boxes (or in this case under the platform boxes) and held majority of my every day clothes. I still had some room for a few pairs of shoes and misc. items.

On the back side of the platform, in between the angled blocks of wood, I was able to slide my tents, folding chairs, and other camping supplies which was easily accessible by the back hatch.
For a little additional storage, I added a roof top storage net and threw my coats and jackets and other little items